
React Native is one of the most efficient ways to ship high-quality mobile apps across iOS and Android without maintaining two separate codebases. For CTOs, Heads of Product, and startup founders, it offers a pragmatic balance of speed, cost, and long-term maintainability when it’s used in the right context and with the right architecture.
This guide walks you through React Native mobile app development: where React Native makes sense, how to structure your app, how to avoid common pitfalls, and what a production-ready delivery process actually looks like.
Whether you’re shipping a mobile MVP or scaling an enterprise-grade product, this is a practical blueprint for using React Native for mobile apps that are fast, stable, and ready for real users.
Key Takeaways
- React Native is best for product teams that need to move fast across iOS and Android with a single codebase, especially for content-driven, transactional, or dashboard-style apps.
- Architecture matters more than framework. The success of any React Native mobile project depends on clear module boundaries, a strong navigation structure, and disciplined state/data management.
- Performance is controllable. With the right tools (Hermes, FlatList, Reanimated, native modules) and patterns, React Native mobile apps can perform reliably under real user loads.
- Testing and CI/CD are non-negotiable. Automated tests, device coverage, and store-ready pipelines are essential for stable releases, not optional “nice-to-haves.”
- DEVtrust helps teams go from idea to store release with a full React Native delivery stack: architecture, UI, state management, API integration, QA, and deployment.
React Native in 2026: Where It Fits and Where It Doesn’t
In 2026, React Native has reached a point where it’s no longer an experiment. The ecosystem has matured, the performance gap with native has narrowed, and the tooling around Expo, TurboModules, Fabric, and Hermes has made development noticeably faster.
But like any technology, it shines in the proper context. The goal isn’t to ask “Should we use React Native?” but rather “Where does it create leverage, and where does it limit us?” That clarity helps teams avoid emotional tech decisions and choose based on trade-offs, timelines, product complexity, and long-term ownership.
When React Native Is a Strong Fit
React Native is a practical choice when you:
- Want one engineering team to maintain both iOS and Android.
- Need to ship in 3–6 months, not a multi-year native rewrite.
- Have a product that is mostly:
- Transactional (bookings, orders, payments, approvals)
- Content-driven (feeds, dashboards, messaging)
- Workflow-driven (forms, tasks, checklists, internal tools)
- Need tight integration with web and backend teams (React + Node, etc.).
- Expect to iterate quickly on UX and product flows.
Good examples:
- FinTech dashboards and wallets
- SaaS admin and companion apps
- EdTech learning apps
- Logistics and field-ops tools
- Marketplaces and booking apps
When Native May Be Better
React Native is not the best tool for every use case. Full native (Swift/Kotlin) might be better if:
- You’re building AAA-grade games or heavy 3D/AR.
- You need deep, low-level hardware access (custom camera pipelines, audio engines, Bluetooth stacks, etc.).
- You require ultra-tight latency (e.g., pro-grade audio/video apps, some industrial control scenarios).
- Your existing org is already heavily invested in native teams and toolchains.
In many real projects, a hybrid approach works well: React Native for most of the product surface, and selective native modules for the 5–10% of features that truly demand it.
Core Advantages of React Native Mobile App Development

For engineering leaders, React Native matters because it accelerates delivery, reduces overhead, and keeps mobile development maintainable as you scale.
- Single Codebase, Dual Platforms: One React Native mobile app codebase drives both iOS and Android, reducing duplication and sync issues.
- Lower Engineering Overhead: You don’t need two fully staffed native teams. A single cross-functional squad (React Native + backend + QA + DevOps) can ship across both stores.
- Faster Iteration with React Ecosystem: Hooks, functional components, React Navigation, React Query, and form libraries make it easy to iterate on UX and product logic.
- Access to Native Power When Needed: For performance-sensitive features, you can integrate native modules or create your own bridges in Swift/Kotlin.
- Strong Community & Ecosystem: Mature libraries for navigation, analytics, crash reporting, auth, payments, and more mean you’re rarely starting from zero.
With this foundation understood, the next step is setting up React Native in a way that won’t collapse when your scope grows.
Architecture & Setup: Getting React Native Right From Day One
A lot of React Native pain comes from starting “small and scrappy” and never fixing the structure. For React Native for mobile apps that need to survive beyond v1, invest early in:
Recommended Tech Stack
- Language: TypeScript (strongly recommended)
- Navigation: React Navigation (Stack + Tabs + Drawer as needed)
- State Management:
- Local UI state: React hooks (useState/useReducer)
- Global app state: Redux Toolkit or Zustand
- Server state: React Query / TanStack Query
- Forms: react-hook-form or Formik
- Styling:
- StyleSheet + design tokens, or
- Utility libraries (e.g., Tailwind-style RN libs) if your team prefers
- Networking: axios or fetch wrapped in a typed API client
- Testing: Jest + React Native Testing Library, Detox for E2E
- Performance: Hermes engine, Flipper, Reanimated, native modules where required
- CI/CD: GitHub Actions / Bitrise / CircleCI + EAS (Expo) or native pipelines
Example Project Structure
Instead of scattering files everywhere, define a predictable layout:
src/
  app/
    navigation/
      RootNavigator.tsx
      AuthStack.tsx
      MainTabs.tsx
    providers/
      QueryProvider.tsx
      StoreProvider.tsx
  features/
    auth/
      screens/
      components/
      api/
      store/
    profile/
    payments/
  shared/
    components/
    hooks/
    styles/
    utils/
  services/
    apiClient.ts
    analytics.ts
    storage.ts
This makes it obvious where each piece belongs and lets multiple developers work in parallel without stepping on each other.
DEVtrust projects typically start by agreeing on this structure during the first 1–2 sprints, so changes stay manageable later.
Step-by-Step React Native Mobile App Development Process
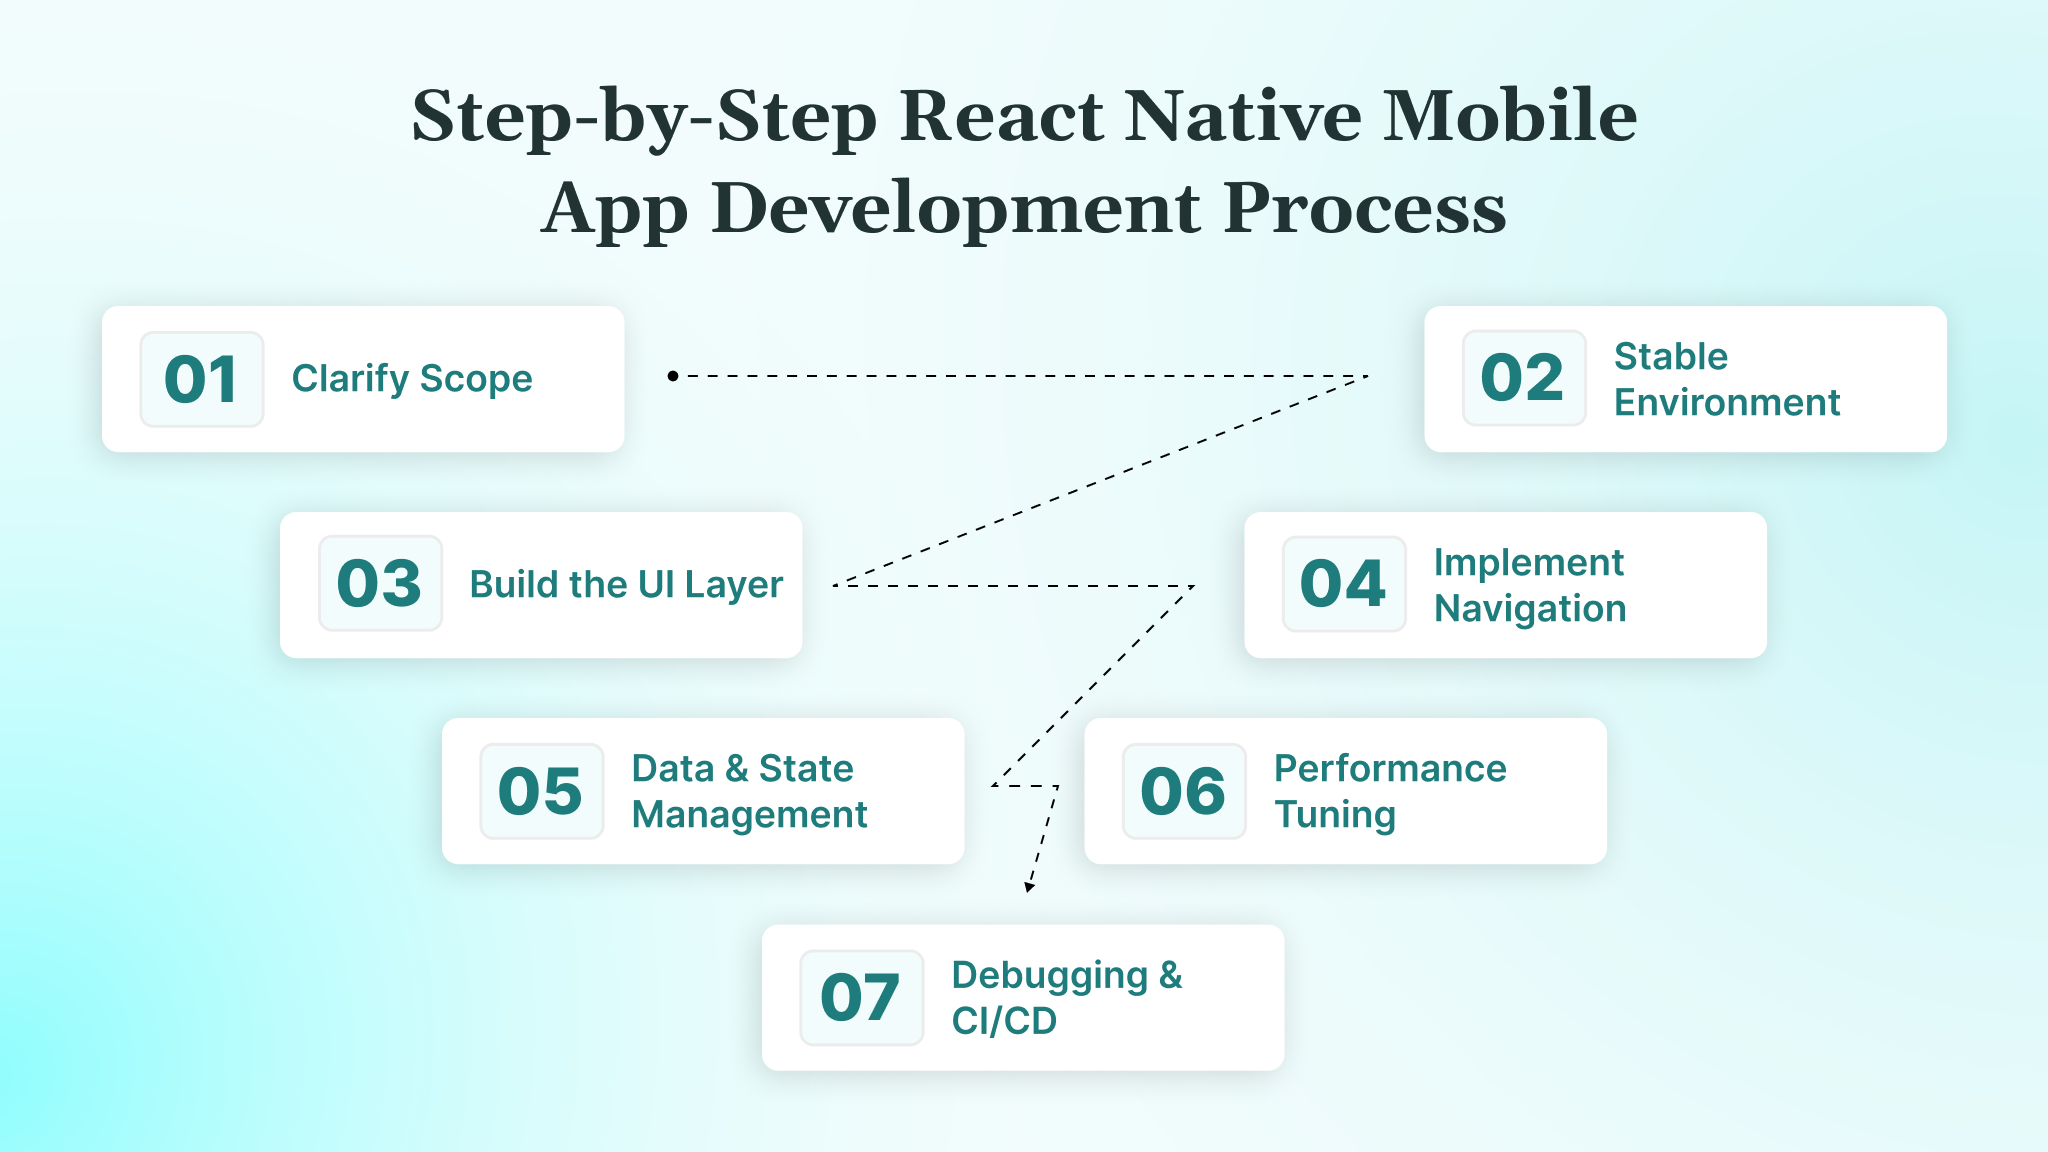
Building a production-grade React Native mobile app isn’t just about writing components — it’s a structured process that goes from planning → development → optimization → launch → monitoring.
Step 1: Clarify Scope, Constraints, and KPIs
Before opening your IDE, make sure you know what you are building, why, and how success will be measured. The failure of most React Native projects doesn’t come from code. It comes from unclear scope and shifting expectations.
- Target platforms: iOS, Android, or both.
- Device tiers:
- Low-end Android (2–3 GB RAM, older CPUs)
- Mid/flagship (where you expect primary revenue)
- Core flows for v1:
- Onboarding and signup
- Login + password reset
- Main dashboard (what users see first)
- 1–2 key transactions (e.g., “place order”, “book slot”, “submit form”).
- Integrations:
- Auth: Auth0, Firebase Auth, custom OAuth server
- Payments: Stripe, Razorpay, Apple/Google Pay wrappers
- Analytics: Amplitude, Mixpanel, Firebase Analytics
- Backend APIs: REST/GraphQL endpoints, rate limits, auth schemes
- Success metrics (per release):
- Time-to-first-value (TTFV) from app open to first meaningful action
- Crash-free sessions %
- p95/p99 latency for key APIs
- Feature adoption (e.g., % users completing onboarding, % users using core action)
A good question to ask here is:
“What must a user be able to do in the first 3 minutes of opening the app?”
Write this into a simple one-page release brief. Your React Native mobile app development effort now has a clear definition of “done” for this iteration, not just “we’ll see”.
Step 2: Set Up a Stable Development Environment
A shaky local setup causes 50% of delays, broken builds, missing SDKs, mismatched Node versions, etc. Creating a standard development environment up front ensures that every developer can compile, run, and contribute without dependency hell.
At a minimum, your team should have:
- Node.js (LTS) and npm or Yarn
- React Native CLI or Expo (depending on strategy)
- Android Studio + SDK + emulators
- Xcode + iOS Simulator (on macOS)
- A base React Native project (npx react-native init or a shared boilerplate)
Once installed, go above the bare minimum and set the foundation for maintainability:
- Enable Hermes for Android (and iOS if appropriate).
- Add ESLint + Prettier with a shared config so code stays consistent across the team.
- Add TypeScript with strict mode to catch errors early.
- Verify that run-android and run-ios produce clean builds on multiple machines.
This eliminates “it works on MY machine” from your future vocabulary, saving weeks of debugging over the project’s lifetime.
Small example of a readiness test:
git clone repo
npm install
npx react-native run-android && npx react-native run-ios
# If this works on a clean machine, your setup is correct.
Step 3: Build the UI Layer with a Design System Mindset
Most bad React Native codebases fail due to UI inconsistencies. A professional app requires a repeatable visual language, not one-off styled components scattered everywhere. So do not start by styling random screens. Start by defining a minimal design system:
- Base tokens (in
theme/tokens.tsor similar):- Colours:
primary,secondary,background,error,textPrimary,textSecondary - Spacing scale:
s4, s8, s12, s16, s24, s32 - Typography:
headingXL,headingL,body,caption - Border radii:
r4, r8, r12
- Colours:
- Atoms:
Button,Text,Input,Icon,Card
- Molecules/organisms:
FormSection(label + input + error)ListItem(icon + title + subtitle + chevron)Toolbar/HeaderBottomSheet/Modal
Then map these into screens like:
LoginScreenDashboardScreenProfileScreen
Think of tokens as LEGO bricks → atoms as 2-block pieces → molecules as assembled shapes → screens as fully built structures.
This approach keeps styles consistent and allows changes at scale. A future redesign becomes token changes, not 300 file edits.
Step 4: Implement Navigation & Auth Flows
Navigation glues the whole app experience together. If routing breaks, UX breaks. Start early with React Navigation, and structure your app like a real product, not a tutorial demo.
Use React Navigation to define app flow:
- An Auth stack for login/registration/OTP/forgot password
- A Main tab navigator for core features
- Nested stacks inside tabs for deeper flows
Best practice examples:
- Lock screens until auth is confirmed (avoid flashing protected UI).
- Persist tokens in SecureStore/Keychain instead of plain AsyncStorage.
- Handle expired tokens gracefully instead of breaking silently.
- Support offline mode where reasonable. Queue requests instead of failing instantly.
This forms the backbone of any React Native mobile app UX, especially for FinTech, HealthTech, or SaaS apps with authentication-first entry flows.
Step 5: Data & State Management That Doesn’t Collapse at Scale
Bad state management becomes technical debt very fast. Avoid the “everything in Redux” anti-pattern and adopt the division of responsibilities.
Use the rule:
| Type of State | Best Tool |
|---|---|
| UI State | useState/useReducer + Context |
| Server State | React Query |
| Business/Global State | Redux Toolkit or Zustand |
Why this matters:
- React Query handles caching, retries, background refetches
- Redux/Zustand organizes business rules clearly
- API logic stays inside dedicated clients instead of scattered everywhere
This is how small RN apps scale into enterprise-level codebases without rewrites.
Example project structure:
src/
 └─ api/
      userApi.ts
      ordersApi.ts
 └─ features/
      auth/
      profile/
      cart/
Step 6: Performance Tuning for Real-World Devices
A React Native app may feel fast on a MacBook + iPhone 15, but your average user might be on a 4 GB RAM device with 20 background apps open.
Build performance considerations early:
- Replace ScrollView with FlatList/SectionList for long items
- Use React.memo, useCallback, useMemo to avoid useless re-renders
- Move heavy animations to Reanimated 2 running on native thread
- Preload images, compress assets, avoid giant SVGs
- Turn on Hermes and test on real low-end hardware
Performance is not optional; it’s UX.
Use Flipper + device profilers to catch:
- Frequent GC cycles
- Large JS bundle sizes
- UI thread blocking on navigation
- Slow API response rendering
This mindset turns demo projects into production-grade apps.
Step 7: Testing, Debugging & CI/CD
A serious app cannot rely on “we tested manually, and it looked fine.” Testing should catch issues before users do.
You need multiple layers of validation:
- Unit tests with Jest for core logic
- Component tests with React Native Testing Library
- End-to-end flows with Detox (login → transaction → success)
- Crash reporting & analytics via Sentry / Crashlytics
- Behavioral insights via Amplitude / Mixpanel
Wrap all this inside CI/CD pipelines:
On pull request:
- Lint + type checks
- Unit & component tests
- Build Android + iOS
On main branch:
- Generate signed builds
- Optionally push to TestFlight, Internal Track OR CodePush updates
Testing creates confidence. CI/CD creates reliability. Together, they create predictable releases instead of risky ones.
Step 8: Store Release & Post-Launch Operations
The final step is packaging your app for real users, but release is not the end.
It’s the beginning of your feedback loop.
For Android:
- Generate AAB, sign & upload to Play Console
- Rollout progressively using tracks → internal → closed → staged → 100%
- Monitor ANR rates closely during ramp-up
For iOS:
- Archive & upload via Xcode to App Store Connect
- Use TestFlight for a staged beta release
- Expect review iterations for UI/permissions/privacy texts
After launch:
- Watch crash rates + logs for first 72 hours
- Track onboarding completion funnels
- Monitor performance & retention metrics
- Ship weekly/bi-weekly iterations instead of giant updates
Apps win by iteration, not perfection on day 1.
A good release mindset:
Launch → Observe → Patch → Improve → Repeat.
Deploying a React Native app requires attention to detail, but once configured, the process is repeatable and reliable. A clean release workflow ensures you can ship confidently and maintain a consistent experience across platforms.
Popular Apps Built with React Native
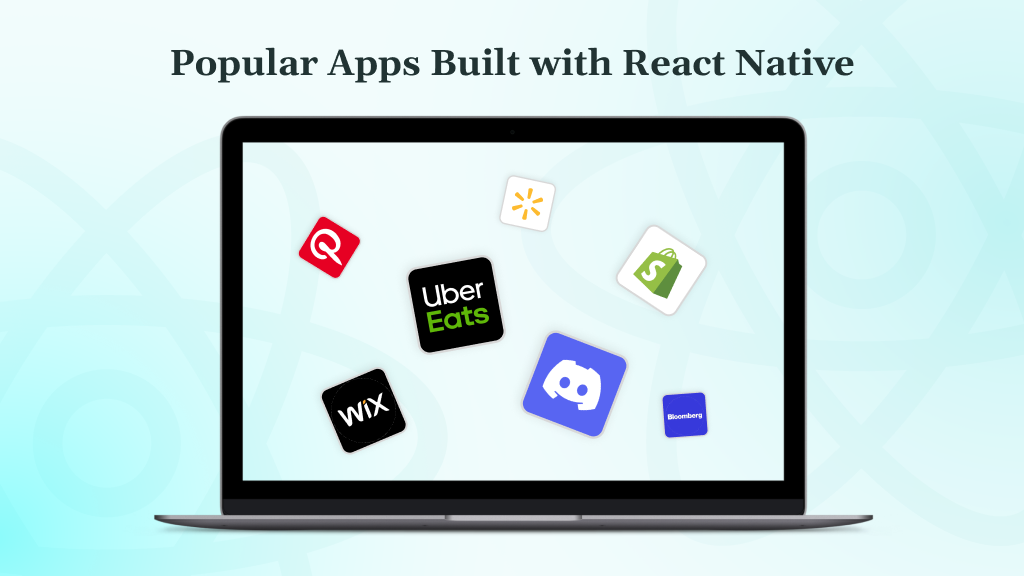
Since Meta actively supports React Native, it is a reliable choice for companies that demand both speed and stability. Here are some popular, consumer-grade applications that React Native powers:
- Uber Eats utilized React Native to streamline its cross-platform delivery experience, enhancing order tracking and enabling real-time UI updates.
- Walmart adopted React Native to unify its mobile shopping app, enhancing feature parity across iOS and Android.
- Discord (iOS) rebuilt its iOS app in React Native for faster iteration and a consistent experience across devices.
- Wix utilizes React Native to power its mobile app, enabling users to manage their websites from anywhere.
- Bloomberg chose React Native to deliver real-time market updates and a fast, data-rich interface on mobile.
- Pinterest tested React Native modules to accelerate feature development across platforms.
- Shopify has integrated React Native into multiple app surfaces to reduce duplication within the mobile team.
These examples demonstrate that React Native is definitely viable and is already trusted by global platforms that manage millions of users. It scales from MVPs to enterprise-grade mobile products.
Common Pitfalls (and How to Avoid Them)
Even good teams fall over the same React Native issues when they move from prototypes to production. These are the failure points that cause crashes, poor UX, and later rewrites.
- Treating React Native as “just React on mobile”: React Native is not a browser environment. You’re dealing with different rendering pipelines, native widgets, memory limits, and device constraints. Teams that treat it like “React with smaller screens” ignore push notifications, offline states, OS permissions, deep linking, and app lifecycle events.
Fix: Plan for mobile realities from day one: app lifecycle (foreground/background), offline behaviour, permissions, native modules, and push flows. Include mobile-specific requirements in your initial architecture doc. - No architecture decisions up front: Many projects start with “just ship something,” and suddenly there are 30 screens, 200 components, and no structure.
Fix: Before adding features, define feature boundaries, folder structure, and data flows. Decide:- How you’ll split features (e.g.,
features/auth,features/profile, etc.) - What lives in shared UI vs feature-level components
- How navigation, state, and API layers are organised
- How you’ll split features (e.g.,
- Overloading global state: A classic anti-pattern: everything goes into Redux or a single global store—UI flags, server data, filters, ephemeral state. This creates noisy updates, hard-to-track bugs, and painful refactors.
Fix: Use React Query/TanStack Query for server state, and keep global state for business-critical flags (auth, roles, feature flags). UI state (modals, toggles, field errors) should stay as close to components as possible. - Ignoring Android edge cases: Apps often look great on an iPhone and fall apart on mid-range Android devices: layout issues, performance hitches, permission quirks, back button misbehaviour, and OEM customisations.
Fix: Treat Android as a first-class citizen. Test on:- Multiple screen sizes and densities
- Low- to mid-tier devices
- Different OS versions
Validate navigation (hardware back), keyboard behaviour, push permissions, and performance specifically on Android.
- Weak testing discipline: Without tests, every change feels risky. Teams rely on manual QA, which doesn’t scale and misses regressions in edge flows such as password resets, retries, or slow network conditions.
Fix: Make tests part of “definition of done”:- Unit tests for utilities and critical logic
- Component tests for key screens (auth, checkout, core workflows)
- E2E tests for onboarding, login, and main flows
Wire these into CI so every pull request proves it hasn’t broken something important.
How DEVtrust Supports React Native Mobile App Development
DEVtrust helps product teams build production-ready React Native mobile applications with clean architecture, predictable delivery, and support for long-term scale. Our approach focuses on reliability, maintainability, and real business outcomes, not just building screens.
- Architecture & Foundation Setup: We define the project architecture, navigation structure, state strategy, and module organisation upfront. Benefit: Clear boundaries reduce rework, keep features isolated, and make scaling the codebase easier as the app grows.
- End-to-End Product Delivery: We cover UX wireframes, component library, React Native implementation, backend API development, and deployment. Benefit: One accountable team owning frontend + backend ensures faster release cycles and fewer integration bottlenecks.
- Production-Grade Engineering Practices: CI/CD pipelines, automated testing, performance profiling, and build workflows included from the start. Benefit: Releases ship with confidence, fewer regressions, and traceable quality across every iteration.
- Secure & Resilient Integrations: We implement payment systems (Stripe, PayPal), analytics (Mixpanel, Amplitude), push notifications (Firebase/OneSignal), auth providers (Auth0/Cognito), and custom APIs with retry logic and token refresh. Benefit: Critical flows remain stable under real usage—no dropped transactions or broken sessions.
- Performance & Scaling Support: Hermes configuration, virtualization for large lists, background sync, bundle optimization, and monitoring dashboards.
Benefit: Apps stay fast on mid-range Android devices and scale without UX degradation. - Long-Term Support & Feature Growth: We maintain code quality, handle dependency upgrades, monitor performance, and expand features post-launch. Benefit: Apps stay healthy over time, reducing technical debt and ensuring roadmap velocity.
At DEVtrust, we engineer mobile products that scale, handle real traffic, and remain maintainable years after launch.
Conclusion
Building software today is not just about completing SDLC stages. Each phase carries decisions that influence how the system performs under load, how easily it evolves, and how stable it is in production. Teams that deliver consistently are the ones that validate assumptions early, design around actual operating conditions, automate repeatable work, and treat post-launch operations as an essential part of engineering.
As architectures grow more distributed and AI tools accelerate development, the fundamentals matter even more. The decisions made in requirements, feasibility, design, and testing shape long-term cost, reliability, and maintainability. A structured engineering-led approach is what separates software that scales cleanly from software that becomes an operational burden.
If you are planning to build or modernize software, DEVtrust can help reduce uncertainty across the entire lifecycle. Our teams handle requirements with the depth needed to prevent ambiguity, assess feasibility based on real constraints, design architectures built for scale and reliability, set up CI and CD pipelines that enforce consistency, and manage post-launch operations that keep systems stable as they grow

Frequestly Asked Questions
Related Articles

Mobile App Development
Blockchain App Development Explained for Product and Tech Leaders

Mobile App Development
A Step-by-Step Framework for Business Mobile App Development

Mobile App Development